Creating old grain on very young unbalanced deadwood

Since it’s been 2 years since my last post, I figured it’s about time to get back into the act of sharing the work I’ve been doing with you guys via the blog.  No, I am not dead.  So I will go into 2016 with a head start by writing about some fun and challenging carving I recently did on a very raw Rocky Mountain Juniper.  Although I didn’t do a very good job documenting the process with photos, I hope you will get an idea of how and why the work I did was carried out.  A combination of heavy duty Dremel bits and various hand carving tools were utilized, I will do my best to explain with the series of before and after photos to follow-

image

There were many long straight branches that were either eliminated in the past by someone or something… It is possible that borers had their way, I found signs of them when I stripped the old bark.

image

Here is the opposite side, at this point the front of the tree will remain undecided until the deadwood is finished and we are ready to style.

image

A closeup to show some detail.

image

A dilution of lime sulfur and water was applied to bleach the newly carved wood.

image

View from above.


A new chapter has begun

Hello all and thank you for the continuing support of my outdated and neglected blog. For those of you who still care (or if you jumped ship and happen to see this I still love you) or if you’ve been left in the dark I hope to clear things up in this post. I recently (2 months ago) returned from an 8 year apprenticeship with my master Shinji Suzuki. It was an honor and great privilege learning from one of the best in the business and I continue to wonder how I got so lucky, but luck turned into hard work and now it is beginning to pay off here in California, the place I’m calling home for the time being. As a major transition thus far in my life, I hope you guys can forgive me for slacking off and not doing any posts since I’ve been back, getting established here has proved more difficult than I imagined. However, I’ve been up and down the coast doing work here and there, including the studio of Boon Manakitivipart, the current godfather of American Bonsai. Boon helped prepare me for the tough life of being an apprentice, and made the introduction to my master possible.

20140612-160711-58031876.jpg
Boon is a classy guy

As well as going up North to do work for Boon, I was down in So Cal working for Michelle Dougherty and her husband Mike of the Windsong Museum of Trees based out of Escondido. I had a great time while I was there and had the fortune of helping set up a Bonsai exhibit with Michelle, Mike and Gary Jones (long standing member and mentor of many in the San Diego Bonsai club). Gary is also a very generous and giving dude, setting the trees on display with him was quite a workout but we got the job done accordingly! Here are a few shots I was able to capture of the show, held inside of a Lexus dealership, of all places. It was a great atmosphere and has become a fond memory too.

20140612-162155-58915524.jpg

20140612-162155-58915138.jpg
A Hollywood Juniper belonging to Windsong that I styled for the show.

20140612-162341-59021276.jpg
And here it is on display!
Sorry if the images don’t appear in order, still figuring out WordPress on my iPhone…

20140612-162707-59227090.jpg</a

20140612-163041-59441917.jpg

20140612-163041-59441184.jpg

20140612-163041-59441523.jpg
And some close ups just so you know I’m not hiding anything. ‘Unique’ eh? I put this planting together using a daring technique that I picked up from my master. It is a Cork Bark Black Pine, property of the Windsong Museum of Trees.

20140612-163525-59725815.jpg

20140612-163526-59726116.jpg

20140612-163525-59725284.jpg

20140612-163526-59726391.jpg

20140612-163526-59726916.jpg

20140612-163527-59727573.jpg

20140612-163526-59726817.jpg

20140612-163527-59727256.jpg
Well my friends, I think that’s it for today, but at least now you have a vague idea of what I’ve been up to in the short time I’ve been back. Much more to come, including trees I worked on from Boon’s yard, as well as a number of others I will be including in future posts so we can watch them develop over the next few years! Thanks, and you should be hearing from me soon.

Fall Work in the States

I’ve been keeping busy even though I’ve been at home for the past 2 weeks.

It always amazes me, seeing all of these faces emerge in our bonsai realm; new and old from all corners of the world, near and far.  Through Facebook and blogging, it seems as if anyone can be a bonsai master.  The same trend is occurring in Japan, the place I have resided for just over 7 years now.  Although bonsai can be a very complicated art with many facets, keeping it simple with a light heart and open mind will allow us and our bonsai to evolve.  A lot of things seem to be at a stand point in America still, including some of the bonsai and practitioners doing it professionally for a billion years.

However, more than ever before, there is serious competition for people trying to make a name for themselves.  This doesn’t scare me because my work will speak for itself, I’m just a new face about to take the plunge.  As long as I have passion for bonsai it has to be my way or the highway, no easy exits for this son.  I know it will never be easy, but it will always be fun, and I can’t do it alone.  I really appreciate all the support given by awesome individuals throughout the years, and I say thank you, with a blog post.  I was called back to Dayton, Ohio to work on the private collection of Luzia Bernstein for some Fall maintenance.  In the following you will see photos of what we accomplished in 3 days.  Shortly after arriving in Dayton, Luzia taxied me off to the Dayton bonsai club meeting where I did my first solo workshop, many thanks to the club for having me and making it an enjoyable experience!  Unfortunately nobody photographed the event…

Image

Image

This is a shore pine grown by Gary Wood, and now its first styling

Image

Here we have a cork bark black pine imported from Japan, also displayed in the US National exhibition

Image

Image

Before and after of a small Itoigawa, still in need of a little adjustment…

Image

I repotted and changed the angle of this Ponderosa last spring, and here it is rewired

Image

We will change the angle dramatically next spring, for now it rests after having the wire removed

Image

Luzia loves her accents, gotta have ’em!

Image

The recently wired trees were put in the greenhouse for winter protection, with temperatures already reaching in the negatives over night.

Image

I believe this is a Pomegranate, lowered some branches last time.  This is how it looks now after trimming back.

Image

Image

A nice black pine grown by none other, Gary Wood

Image

Image

Hope you all enjoyed, this is how things looked at the end of the last day.  Thank you Luzia for your amazing hospitality!

Whipped back into shape, with love

This Shimpaku was once owned by a man named Oguchi, a famous Bonsai collector.  I believe it appeared in one of his books over 20 years ago, when I find the photo I’ll be sure to include it next time, old records are great informers.

I worked on this tree for last years Kokufu.  At that time only detail wiring and an overall balance check were necessary.  Here is how it looked last winter.

Image

Its current owner brought it back to us this summer for work, it ended up needing to be completely de-wired, deadwood cleaned, and rewired.  When over half is cutting in its usually better to just take it all off and let the tree rest.  In this case, however, Mr. Suzuki had other plans.  I later found out that this tree now belonged to my teacher, and being the multi-talented kind of guy that he is, he decided the tree was healthy and ready to be passed on to another.  Easier said than done, yes?  It became my lucky day; I was to rewire it in a soft and unobtrusive manner (avoiding wire scars) keeping in mind that simplicity in technique was required in order to do this old Juniper justice.  Having worked it before, I had a pretty solid idea about what needed to be done, so I went to work.  here are the results!

Image

Image

Revisiting an old friend

Hey folks, I know its been a while.  My gracious sempai Mike Hagedorn was nice enough to do a post about my recent work here at the nursery of Shinji Suzuki, and because of that act of kindness I gained a few new friends here at Reelbonsai.  Since I used up all of my good “before and afters” of Juniper on Mike’s blog (Crataegus.com) I had to get creative.  Today was a scorcher, mid 90’s with too much humidity, so in between watering and other daily apprentice tasks, I was asked to re-adjust a white pine that I had wired a year before.  My teacher bought it from a client, it had grown leggy and out of proportion.  Although I don’t have a before pic, here is what this old guy looked like after my first wiring on it.

Image

After the first styling last winter, not bad for the first go, but some things just didn’t seem balanced, maybe a little too heavy in places, maybe one or two unnecessary branches, something just didn’t click with the final image at the time, and boy would this tree explode with new growth throwing everything way more out of control… once again, I was not thinking and didn’t get a before pic of how this pine looked prior to my revision today, I think all the sweat that dripped into my ears today somehow got into my brain… so here’s how it looked all spruced up after a couple hours  of readjusting.

Image

It actually looks like a different tree, thats the fun part about white pine, when the new growth finally hardens off after months of arduous pin point watering; don’t want the needles to get too long and white pine don’t like a lot of water.  One time a day heavily in the morning from the time the new candles begin to elongate, about the end of July.  

An old thin tree like this requires a pretty good deal of pre-determined contemplation.  Like any species or style of Bonsai, you want to show off or highlight certain characteristics.  This is a bunjin, so the first thought  in ones mind should be “compact” and having more separation between the smaller foliage pads.  

You might notice that my first attempt didn’t quite live up to this philosophy, the branches don’t seem very interesting and don’t compliment the movement of the trunk, and the tree overall was still not very compact.  It became apparent that a branch in front up near the apex was too heavy, by removing it and lowering some of the main branches really allowed me to close everything in and the new design became worthy of the trees age.  Hope you enjoy the new look, it was a fun challenge and a good excuse to get out of the heat!

Autumn Displays for Taikan-ten

This year we have about 7 displays in Taikan-ten, the Bonsai exhibition which focuses heavily on the art of display, held annually at the Kyoto Art Museum.  Although I am unable to attend this event, I was able to help put together some nice displays with the team a couple days before the start of the show.  As always, being in the same room as my teacher and the Tokonoma (display alcove) was a fun day full of learning and trying to understand or even shed a little light on the deeper meaning manifested within each display.  So what is the point of Bonsai display?  Yes, to show off how awesome our tree’s have become, of course.  However, when we think about formal displays that exhibit multiple components (scrolls, accents, etc) we need to firstly acknowledge the season.  Since Taikan-ten is held at the end of Fall in Japan, most of the displays you will see deal with Fall scenery and subtleties of life accordingly.

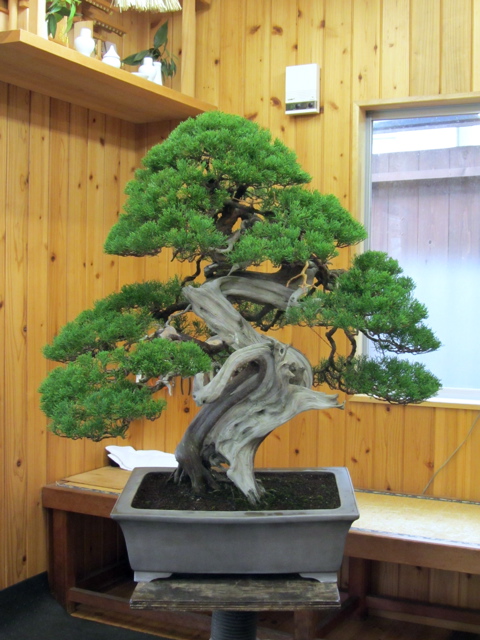
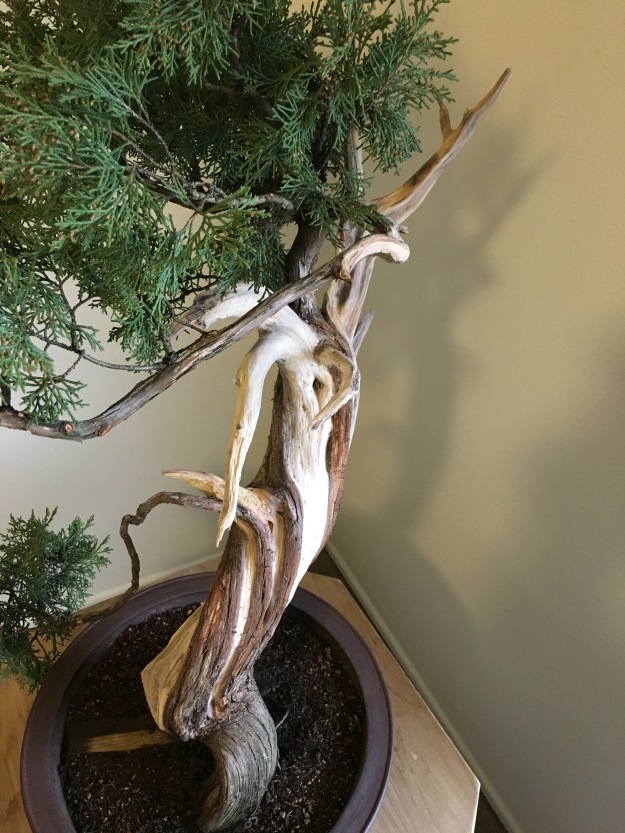
Here is a Shinpaku I was given to wire for the show, what does this display tell you?

To me, this display captures the change of season, Fall becoming Winter.  One good clue to look for is the snow on the mountain, it looks as if snow just fell for the first time.  I considered using a stone for the accent, but the softer yet grand appearance of the tree called for something less dramatic, therefor, a fern accent plant was chosen.

My teacher owns a plethora of scrolls, we often try a few out before deciding the most suitable image. I was told the Kanji on this one means “Eastern light”.  Rising sun?

I wouldn’t say that this scroll is “wrong” for this display, it just feels a little over-powering.

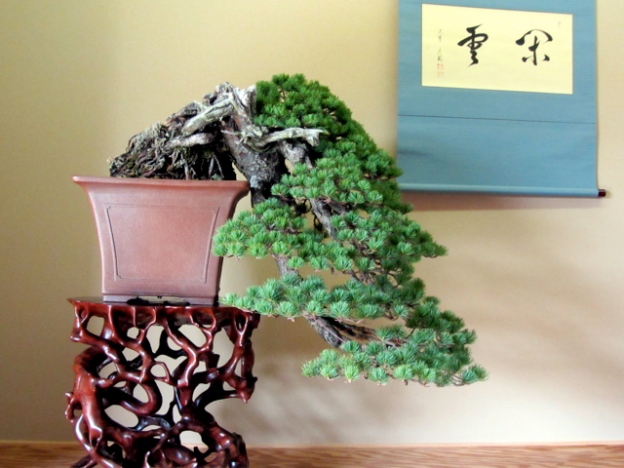
Oyakata left it up to Tyler to compose the display for this “Mube” (pronounced mooh-beh).

There is a very curious and interesting history behind this wild vine, which is native to Japan and other countries in the East.  These vines can pop up anywhere, as their seeds are spread by bird droppings.  I hadn’t realized this before which is why I’m impressed with Tyler’s initial decision of the Suzume (Sparrow) scroll.  Just goes to tell you, when making a display going with your gut and first instinct is usually the best thing to do.

The scientific name for MUBE is stauntonia hexaphylla.

MUBE got its name centuries ago when a family living in a little town on the shores of Lake Biwa in Shiga-prefecture offered MUBE fruit to the Imperial family.  Apparently in the 7th century MUBE was a rare fruit; it was told that the emperor Tenji encountered an elderly couple when hunting around Lake Biwa.  He asked the couple “how do you stay so strong in old age”?  The couple responded to the emperor “here there is a special fruit that has the power to give long life and keep the sickness away”.  Upon trying the fruit himself the emperor exclaimed “MUBE NARU KANA”!  “It is indeed so”!  So there you have it, the magical story of MUBE!  Now I gotta try one of these for myself…

Switched up a little bit.

Here we have a new flowering accent plant and a scroll with falling red maple leaves.  I like the narrowness of the scroll better, it works for the overall balance but just doesn’t seem to have as much of a story behind it.  For that reason I lean toward the first display with the Sparrow and old man figurine.  It draws a full circle of meaning, and tells a story; that I do believe is the essence of a great display.  Also one note about the stand!  You don’t want the stand drawing more attention to your eye than the tree, the simpleness of this stand works best with the MUBE.

I call this the “Darth Helmet Tree”.

This Red Pine has such a broad apex it makes me giggle to myself at times, however, one might feel a little tipsy with all that leaning movement if there was a little dainty apex instead.  This tree has been wired 3 times in the last few years by three different artists in this order: Omachi Isao, myself, and most recently refined by Tyler.  We also call this the “never ending tree” because it seems impossible to get the balance just right.  No scroll was used, just a simple set up using a nice root slab and accent plant.

Tyler getting a few pointers from the master during the photo shoot. The camera don’t lie!

Relaxing and taking in the beautiful colors, Chinese Quince.

When my teacher is explaining what the writing on a scroll such as this one mean, it is very easy to get lost in translation, so to speak.  There is usually a whirlwind going on inside of my head when this happens, so I just try to snag the key words before they get blown away in the torrent.  From what I can remember, the kanji describes the movement of clouds, and how they remind us that life is always moving and changing.  And here we have in this display an elder, sitting beneath the clouds reflecting on a cool Autumn day.

Just chillin

Once again, the famous Shishi that won Kokufu last year, in all its glory.

These wooden deer carvings are not of the best quality, but a safer way in case somebody feels like shop-lifting.

You can’t see it too well, but that is an image of Mt. Fuji in the background.  It is very faint, maybe the artist was trying to suggest that he was up at the crack of dawn painting it… or not.  Anyway, it gives me an early morning feel, especially with the deer already awake.  Hope you enjoyed these displays and learned something along the way, definitely more posts to come on this subject!

Its almost that time of year…

Kokufu.  For apprentices the often dreaded yet more anticipated time of year.  As fall approaches preparations are put into play.  Living and having a Bonsai nursery in a cold place like Nagano has its ups and downs, and downfalls of snow and well below freezing temperatures.  November is a walk in the park, but once December comes around one need be prepared!  I have vivid memories of breathing hot air into the hole of frozen locks before leaving work after a long day of wiring and Kokufu prep, guess it would pay to be a smoker in situations like this one (note to self: smoke one cigarette when closing up in winter.)  With that said, here are some more memories captured leading up to the most prestigious Bonsai exhibition in the world (although I hear those guys from the village have some pretty earth-shattering plans in the making.) 😉

In the old days at the old museum, Kokufu-bound trees were kept and watered inside a temperature controlled room.

Since changing location of the museum and garden from across the street to the grape orchard a few years ago, we have been housing Kokufu Bonsai in a small greenhouse constructed specially to keep the cold away.  You may even think I’m crazy when I tell you this, but we even add an extra layer of bubble wrap on the interior to add a little extra insulation.  Foliage will naturally change color in the hibernating period, especially Juniper, which tend to go bronze.  Therefor, acting before the frost is essential, if you live in a cold environment and want to show a tree in the winter, doing what you can to keep the foliage vibrant and green is a must for conifer species.  Also, take extra care after any repotting and keep those roots from freezing.  Here at the nursery, we often use blankets, laying them gently over and around the container and root system.  This helps too when a tree is root-bound or in an expensive or old container, better safe than sorry, so just wrap it up!

Working on a Shinpaku for Kokufu during my second year.

Oyakata touching up the silhouette on a nice Chinese Quince.

Nothing says “Kokufu” like an old ramified Choujubai!

These little guys work great in a Chuhin or Shohin display.  They produce flowers non-stop throughout the year (less in winter.)  It is important to take off the flower buds in summer to develop finer and stronger branching, flowers or fruit on trees in general sap energy and weaken the tree.

Here’s our little friend in a full 3-point display with a more impressive counterpart, this Black Pine went on to win a Kokufu award that year, I think it was #80 or 81.

Going through these old photos makes me realize (or maybe worry is a better choice of word?) about our lack of Bonsai related elements in the U.S.  I can only speak for myself, but I think we could all use more stands and show-quality pots, this will only up the level of our Bonsai put on display.  Not to say we need to import everything from Japan necessarily, but it would help.  On the upside, I’ve been seeing a rise in quality with our native collected material on the West-side, and I am all too excited to get back to my home in Portland, OR and start taming then letting these magnificent beauties fill into and reveal their natural age and greatness.  We have so much untapped potential, whereas good collected material in Japan is no longer a resource.  We will come into our own with the right knowledge; I think the village will be the center of a thriving Bonsai community someday with people like Mike Hagedorn, (founder) Ryan Neil (cofounder) and hopefully myself when I complete my apprenticeship.

Recognize? My first Kokufu work waiting to be judged at the Greenclub in Ueno.

Well, its getting late, the dog’s at Tommy’s bar are barking and howling at the cold night and passerby.  Repotted a few tree’s for Taikan-ten today, the show is coming up in a few days, think it starts on the 23rd.  If you don’t get a chance to make it I’ll add some pics here shortly!  Don’t know yet which apprentice will get to go and who will be watching house, so be sure to check the blog of Tyler Sherrod (Tyler Sherrod Bonsai) or mine for updates in the coming week or two.

All cherried out and ready to go. 😉

Happy Thanksgiving, be sure to eat some extra helpings for Tyler and I, we could use it!

White Pine Cascade

It can be refreshing getting back into the world of blogging.  Writing was always a passion of mine, finding time for it can be another story though… hoping to produce more insightful posts before the end of my apprenticeship here in Japan, coming soon!   Perhaps not as soon as I imagined… so please bare with me here.  I may become (or already am) the longest staying foreign apprentice to study Bonsai in Japan.  Here is another sample of some of the wiring I’ve been doing here at Mr. Suzuki’s nursery here in Nagano, JP.  Hope you enjoy.

Goyomatsu – before

Goyo – after styling

Cascade style tree’s always look at home on a nice root stand (nejouku.)  The current pot is a little strong and over-powering, even though it is a dominating cascade.  A nice round or Nanban style pot would be more fitting for the overall balance of this tree and display.

That’s all for now, just a simple before and after.  Stick with me I’ll need all the support I can get during my 7th year. I am constantly surprised at the broadness of Bonsai, how it manages to tie everything together in unexpected ways.  Look forward to sharing my work and experiences with all of you in the year to come.  My old English teacher in high school (he taught Eastern philosophy and religion in my first year) always taught me two things: “repetition breeds mastery,” and “work hard, but don’t work your ass off.”  This year I’m sure I will be doing both.


The Past & Present: A Kichou Bonsai with a Promising Future

Japanese Bonsai deserving to be deemed “Kichou Bonsai” (important Bonsai masterpiece) most likely have a long history living in a pot maintained by caring individuals throughout the past.  Even during difficult times such as WWII, Bonsai stayed alive because people never wavered in keeping them that way.  In my mind, Kichou Bonsai represent many things besides the title and dog tags they are given.  They are all we held and still hold, living objects of great importance and age; a symbol of peace.  In this post I share with you a Shinpaku Juniper that I prepared for the Kichou Bonsai judging that took place a few days ago.

Here I am in deep contemplation before repositioning the branches. Unfortunately this is the only before pic!

We finished repotting the soon to be Kichou and  luckily my good buddy and partner in crime was there to capture the action, thanks for the great shots Tyler!  I won’t fault him for standing around taking pictures when he has a collection of paparazzi photos like the one above… since this was taken I haven’t dozed off a single day during our lunch break… bad Kohai!!!

Ok I lied. Here is a before of the tree after repotting.

Looking spiffy in a antique Chinese Shudei. Soft yet sturdy, a good match for this tree.

Good Bonsai are often dealt between client and professional like professional athletes in some ways.  My teacher acquired this one from a trade with one of our clients in Niigata.  We always like working on his trees because he keeps them very healthy and has an impressive collection of natural Itoigawa (un-grafted), which are difficult to come by these days.  In Japan, many have died in the past, making those that are left pricey even in todays lagging economy.

The same tree pictured in a past Kokufu album.

There you have it, history in the making!

Not completely satisfied with the left side of the atama (head)
Both require a little more adjusting!

Any work on the branches was very subtle, as the tree was previously wired last summer.  However, a closer look at the overall balance and cleaning up the lines were routine but necessary tasks nonetheless.  Refinement can be some of the most head-splitting work in Bonsai!  In the end your attention to detail will always pay off… so only look on the bright side!  Only by doing this will our Bonsai reach a higher level, along with our patience and understanding.

After re-working the top left side of the apex. Can you see the change?! More compact and in line, keeping in mind the natural flow and emphasizing the movement to the right.

A nice root stand was chosen. Presentation is very important to the judges, and they are strict indeed.

If you enjoyed this post, check out Tyler Sherrod’s blog for complete coverage of our Kichou Bonsai entry’s this month!  Happy blogging I’ll be back with more soon!

The Beheading

A few days ago Tyler and I had the luxury of “house sitting” the nursery while team Japan (our oyakata and the other apprentice named Yuusuke) were out of town hunting for new trees and various Bonsai treasure via auctions in Tokyo and Saitama.

Although we are expected to take care of business in his absence (no slacking off!  Ok, maybe a little…) we get the rare opportunity to work on some of our own trees and experiment, using some of the knowledge we work with on a daily basis in our own way.

Before separation - making one tree into two

This is a tree that was grafted for fun a couple of years back by one of our clients.  As well as an extreme change in planting angle, roots and a branch (a variety more suitable for refinement) were added using approach grafts.  I’m sure many of you have seen this technique used by Iiura-san, one of the grafting godfathers of Japan.  I initially brought this bunjin into the workshop to get a closer look and look for signs of success, but after wiggling the branch grafted on top, it was clearly a failed attempt just by the way the thing moved if you were to touch it in the slightest.  The root graft felt solid enough, so we decided to chance it and end it with one fell swoop… off with the head!

Oops! After sawing off the uninteresting top

I won’t go into great detail about Juniper grafting techniques in this post, just always take great care and be cautious before being bold with these kinds of decisions!  Sometimes the only way to find out is by taking chances, so always leave many branches and make sure your juniper are strong and growing well before grafting.  And if you know you want to graft, hold off on repotting as this tends to slow the tree down a bit.  The type of approach grafting we like works better on larger trees, as the scions are not little cuttings, but rooted seedlings.  This way you can water the roots of the seedling, keeping it alive until it has fused with the parent.  Branch grafts using this method, if performed correctly are very efficient, taking only one growing season before the supporting roots can be chopped.  Vice versa, root grafts tend to take longer because you want enough roots to grow before discarding the original mass which can destroy the tree if the graft was faulty in some way.  One way to tell is by simply cutting off the foliage of the grafted sapling, if the roots continue to grow then you know they are helping support the tree.  Also, if you notice swelling above the area of insertion, you may assume that things are going well.  In the case of THIS tree, we had nothing to lose, and two or three years had passed since the grafting was done… so all in!!!

A close up - Tyler holding his new tree!

The next step will be to pot this baby up in a growing container and let nature have its way.  Next year we can graft better foliage and eventually end up with a decent shohin with lots of deadwood, perfect material for our future experimentation.

Alas, we have two tree’s with unworthy foliage.  However, we now have clarity and a clear game plan.  Keep in mind, an amateur  first grafted freely on this poor guy, and who knows what was going through his mind.  Before we had a mass of confusion with a nice lower trunk, now we have two trees with good potential.  But what to do with the lower trunk?  More grafting coming this June!  Here are some more shots for your contemplation.

Some nice twist and shari near the base

This is the type of stock we use for grafting (rooted cuttings)

Another view revealing the movement, critical to have in a bunjin Juniper!

Always good to have a lot of cuttings! My hair is starting to look like this now...

Still haven’t decided on the front and inclination for the lower half… I’ll take another look when summer arrives, grafting time.  Hope you enjoyed the beginning of this project, I’ll continue documenting the progress of both tree’s and share the results!  We should see some interesting results within the next 2 years, hope you look forward to seeing them!